
Technical Tip
Alternatively, you can select EDIT | HEADER to display this screen.
Use this procedure to create a new batch of standing orders to be processed.
To create a new batch of standing orders:
Refer to "Standing Orders - Print Standing Orders".
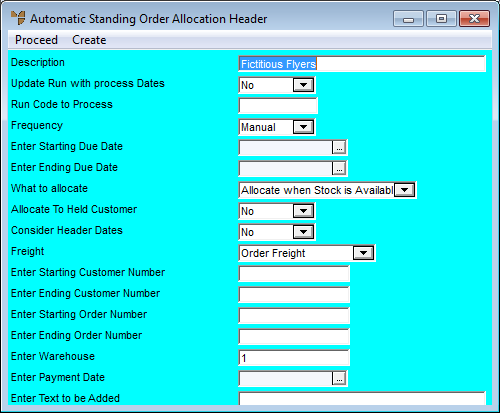
Micronet displays the Automatic Standing Order Allocation Header screen.
|
|
|
Technical Tip Alternatively, you can select EDIT | HEADER to display this screen. |
|
|
Field |
Value |
|
|
Description |
Micronet displays the batch description you entered. |
|
|
Update Run with Process Dates |
Select Yes if you want Micronet to update the Run Code Next Due Date when this batch is processed, or select No if you don't want the due date updated. |
|
|
Run Code to Process |
Enter or select the run code to be processed in this batch. |
|
|
Frequency |
Micronet displays the frequency associated with the run code you selected. |
|
|
Enter Starting / Ending Due Date |
Optionally, enter or select a starting date and an ending date for the standing orders you want included in this batch. Any standing order with the selected run code and within this date range will be processed in this batch. |
|
|
What to allocate |
Select how orders in the batch are to be processed. Options are:
|
|
|
Allocate to Held Customer |
Select No if you only want Micronet to process standing orders for customers who are not on hold. Select Yes if you want Micronet to process standing orders for all customers, including those with an On Hold flag. |
|
|
Consider Header Dates |
Select Yes if you want Micronet to take into account the standing order start and end dates set on the Standing Order Header screen, or select No if you don't. |
|
|
Freight |
Select how freight is to be calculated for the standing orders in the batch. Options are:
|
|
|
Enter Starting / Ending Customer Number |
If you want to limit processing of standing orders to a particular customer range, enter the starting and ending customer numbers. |
|
|
Enter Starting Order Number |
If you want to limit processing of standing orders to a particular order range, enter the starting and ending order numbers. |
|
|
Enter Warehouse |
If you want to limit the stock selected to a particular warehouse only, enter the warehouse number. |
|
|
Enter Payment Date |
Enter or select the date by which payment for this standing order is due. |
|
|
Enter Text to be Added |
Micronet allows you to add a line of text to each slip or invoice. Enter any text required, e.g. you might enter "March 2011" for standing orders for that month. |
Micronet redisplays the Automatic Standing Order Allocation screen.
Micronet redisplays the Automatic Standing Order Allocation screen with a list of all the items and debtors included in the standing order batch.
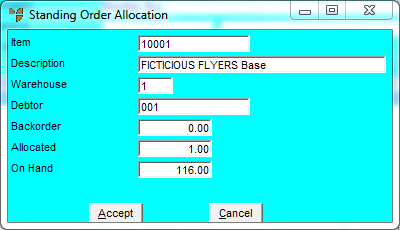
Micronet displays the Standing Order Allocation screen.
Micronet redisplays the Automatic Standing Order Allocation screen.
Refer to "Automatic Standing Order Allocation - File - Report".